Springboot的优点
约定大于配置 ; 帮我们自动配置了我们需要配置的内容; 并且帮我们自动下载了需要下载的jar包以及运行环境;
优点: 方便,作为初学者来说直接使用就可以了;
缺点: 出现问题,我们作为初学者很难去定位解决;
1、点击文件file==>点击新建new==>模块moudle

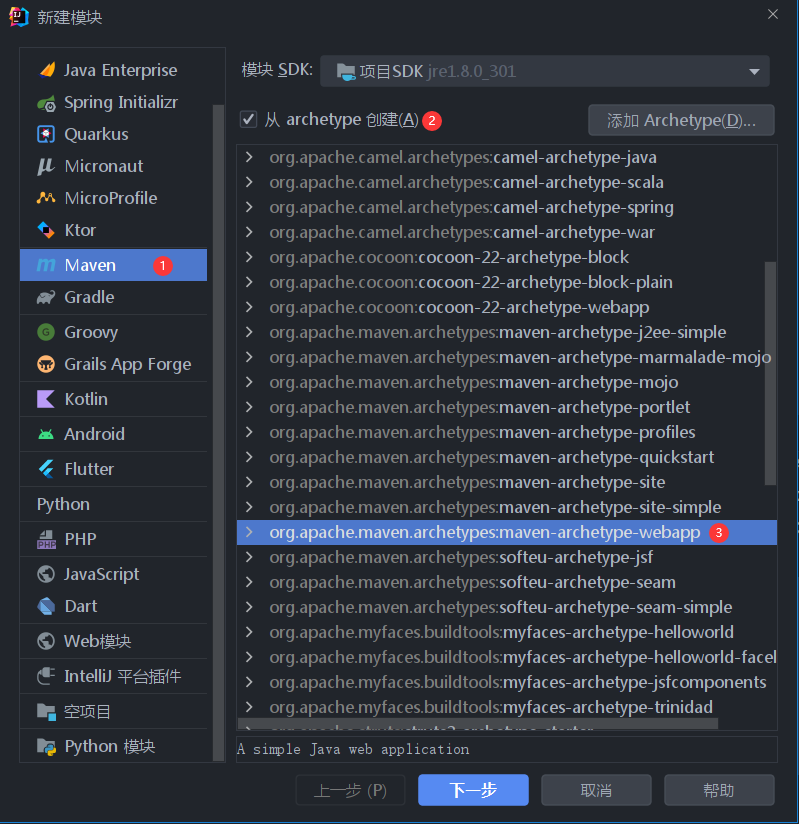
2、选择maven==>勾选从archetype创建Create from archetype==>maven-archetype-webapp==>下一步

3、根据图设置之后点击下一步

4、点击下一步

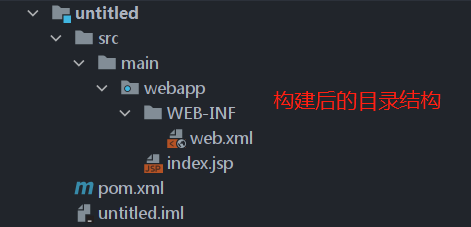
5、创建后的初始结构

6、右击src==>点击新建new==>目录directory

7、选择图片中的所有项,按住SHIFT,左击,然后按回车键即可完成操作。

8、修改后的项目结构图

9、修改pom.xml配置依赖文件
(1)删除所有build包含的标签
  <build>
    <finalName>untitled</finalName>
    <pluginManagement><!-- lock down plugins versions to avoid using Maven defaults (may be moved to parent pom) -->
      <plugins>
        <plugin>
          <artifactId>maven-clean-plugin</artifactId>
          <version>3.1.0</version>
        </plugin>
        <!-- see http://maven.apache.org/ref/current/maven-core/default-bindings.html#Plugin_bindings_for_war_packaging -->
        <plugin>
          <artifactId>maven-resources-plugin</artifactId>
          <version>3.0.2</version>
        </plugin>
        <plugin>
          <artifactId>maven-compiler-plugin</artifactId>
          <version>3.8.0</version>
        </plugin>
        <plugin>
          <artifactId>maven-surefire-plugin</artifactId>
          <version>2.22.1</version>
        </plugin>
        <plugin>
          <artifactId>maven-war-plugin</artifactId>
          <version>3.2.2</version>
        </plugin>
        <plugin>
          <artifactId>maven-install-plugin</artifactId>
          <version>2.5.2</version>
        </plugin>
        <plugin>
          <artifactId>maven-deploy-plugin</artifactId>
          <version>2.8.2</version>
        </plugin>
      </plugins>
    </pluginManagement>
  </build>
(2)继承springboot父项目,引入web,test相关依赖
<groupId>cn.com.dvy</groupId>
    <artifactId>handwork_SpringBoot</artifactId>
    <version>1.0-SNAPSHOT</version>
    <packaging>war</packaging>

    <properties>
        <project.build.sourceEncoding>UTF-8</project.build.sourceEncoding>
        <maven.compiler.source>1.8</maven.compiler.source>
        <maven.compiler.target>1.8</maven.compiler.target>
    </properties>

    <!--1.继承springboot父项目-->
    <parent>
        <groupId>org.springframework.boot</groupId>
        <artifactId>spring-boot-starter-parent</artifactId>
        <version>2.2.5.RELEASE</version>
    </parent>

    <dependencies>
        <!--spring-boot-stater-web-->
        <dependency>
            <groupId>org.springframework.boot</groupId>
            <artifactId>spring-boot-starter-web</artifactId>
        </dependency>
        <!--引入springboot-stater-test-->
        <dependency>
            <groupId>org.springframework.boot</groupId>
            <artifactId>spring-boot-starter-test</artifactId>
            <!--scope test 仅仅在测试时有效  运行 打包 不生效-->
            <scope>test</scope>
        </dependency>
    </dependencies>
10、创建application.properties文件
项目中创建application.properties文件
src/main/resources/application.propertiesapplication.properties内容
#tomcat端口
server.port=8080
#项目名
server.servlet.context-path=/untitled
首先说一下 server.context-path ,它代表的是应用上下文根
server.context-path=/untitled例如我在 application.properties 中配置了 server.context-path=/untitled ,那么我访问服务端资源的时候就必须加上 /untitled
例如:你要访问到这个 Controller 中的 /hello 映射,那么你浏览器发起的请求就要是http://localhost:8081/untitled/hello/hello
11、创建入口类函数
D:\springbootproj\untitled\src\main\java\cn\com\dvy\Application.javaApplication.java文件内容:
package cn.com.dvy;

import org.springframework.boot.SpringApplication;
import org.springframework.boot.autoconfigure.SpringBootApplication;

/**
 * @author cn.com.dvy
 */
@SpringBootApplication
public class Application {
    public static void main(String[] args) {
        /**
         * 入口类函数
         */
        SpringApplication.run(Application.class, args);
    }
}
12、创建控制层
D:\springbootproj\untitled\src\main\java\cn\com\dvy\controller\HelloWorld.javaHelloWorld.java文件内容:
package cn.com.dvy.controller;

import org.springframework.stereotype.Controller;
import org.springframework.web.bind.annotation.GetMapping;
import org.springframework.web.bind.annotation.RequestMapping;
import org.springframework.web.bind.annotation.ResponseBody;

@Controller
@RequestMapping("/hello")
public class HelloWorld {
    @GetMapping("/hello")
    @ResponseBody
    public String hello(){
        return "Hello World!";
    }
}
13、运行main启动项目
(1)启动项目


或者通过快捷键Ctrl+Shift+F10启动项目。
(2)启动项目成功后

14、访问项目
http://localhost:8081/untitled/hello/hello 达维营-前端网